Category: Relational Databases

Connecting MySQL Using Oracle SQL Developer

This article explains how to configure Oracle SQL Developer to connect to MySQL.

  1. Download SQL Developer from Oracle website.

https://www.oracle.com/ca-en/tools/downloads/sqldev-v192-downloads.html

SQLD_1

Once you download the rpm package, Install it using the below commands.

SQLDeveloper_1

2.  Download latest MySQL Connector (https://dev.mysql.com/downloads/connector/j/) and move it to SQL Developer directory.

Make sure you download “Platform Independent” version.

Screenshot from 2020-03-17 14-00-35

3. Now you have to make MySQL aware of this third party connector.

Navigate to “Tools > Preferences > Database > Third Party JDBC Driver” and Click the “Add Entry…” button and highlight the “mysql-connector-java-8.0.19-bin.jar” file and click the “Select” button. Then click the “Ok” button to close the window.

SQD_2

4. Open the New Connection window and create a new Database Connection.

SQD_3

4. Now you will find a new value in the “Database Type” drop down, select MySQL and enter your credentials and database details. Please note that the hostname and port number might be different for your environment.

SQD5

5. Try to test the connection and if that is successful click on “Connect”.

6. You will land the SQL Developer Home Screen and will be able to query the MySQL database just like you query Oracle.

SQD_6SQD_7

I haven’t explored all the features available for MySQL connection. You can do all that yourself.

PS: In case you face the JDBC timezone error you can fix that by running the following MySQL commands (Please check with your DBA before you run it against any of your company MySQL databases)

Status : Failure -Test failed: The server time zone value ‘EDT’ is unrecognized or represents more than one time zone.
You must configure either the server or JDBC driver (via the ‘serverTimezone’ configuration property) to use a more specific time zone value if you want to utilize time zone support.

SET @@global.time_zone = '+00:00';
SET @@session.time_zone = '+00:00';

With the following SQL statements check if the values were set:

SELECT @@global.time_zone, @@session.time_zone;

Hope this helps..

Informatica Performance Issue (Oracle Implicit Case Conversion/NVARCHAR2 to VARCHAR2 )

This blog is about an Informatica performance issue we faced because of Oracle implicit type conversions. We were asked to troubleshoot a new Informaitca workflow which was running way longer than expected. A quick check on the V$SESSION table provided us the SQL ID and the query.

The query was a single table update and the where clause has all the columns that were the part of primary key. Still the query was not using the index and were going for a full table scan.


----------------------------------------------------------------------------------------------------------------------------------
| Id  | Operation             | Name        | Rows  | Bytes | Cost (%CPU)| Time     | Pstart| Pstop |    TQ  |IN-OUT| PQ Distrib |
----------------------------------------------------------------------------------------------------------------------------------
|   0 | UPDATE STATEMENT      |             |       |       | 22850 (100)|          |       |       |        |      |            |
|   1 |  UPDATE               | ########### |       |       |            |          |       |       |        |      |            |
|   2 |   PX COORDINATOR      |             |       |       |            |          |       |       |        |      |            |
|   3 |    PX SEND QC (RANDOM)| :TQ10000    |     1 |   122 | 22850   (1)| 00:00:01 |       |       |  Q1,00 | P->S | QC (RAND)  |
|   4 |     PX BLOCK ITERATOR |             |     1 |   122 | 22850   (1)| 00:00:01 |     1 |    16 |  Q1,00 | PCWC |            |
|*  5 |      TABLE ACCESS FULL| ########### |     1 |   122 | 22850   (1)| 00:00:01 |     1 |    16 |  Q1,00 | PCWP |            |
----------------------------------------------------------------------------------------------------------------------------------

Predicate Information (identified by operation id): 
--------------------------------------------------- 
5 - access(:Z>=:Z AND :Z<=:Z) filter(("#######"=:20 AND SYS_OP_C2C("#######")=:14 AND SYS_OP_C2C("#######")=:15 AND SYS_OP_C2C("########")=:16 AND SYS_OP_C2C("########")=:17 AND SYS_OP_C2C("########")=:18 AND SYS_OP_C2C("#######")=:19 AND SYS_OP_C2C("#########")=:21))

You can clearly see the above plan that the query is doing for an FTS. The predicate information shows SYS_OP_C2C function is used against each column and this prevents the query from using indexes. We then changed the source and target column type in the transformation to VARCHAR2 and the query started picking the right index.

Hope this helps.

Load Testing Oracle Stored Procedures Using Apache JMeter

Last week I was asked to load test few oracle stored procedures created by another team. These stored procedures are invoked by java services and the delivery team wanted to test them in the performance environment before pushing them to production. I was asked to use an Open Source tool for this testing since the project doesn’t have budget to buy a commercial tool.

Since Apache JMeter is a free tool, we decided to use it for our testing. The stored procedure takes one INTEGER value as input and returns an INTEGER value and a cursor as out put. The input value came from a CSV file which has 100K records that we mined from the database. I have detailed the steps we used to create a database test plan, our biggest challenge was to receive cursor output from the stored procedure. Details on how we achieved this can be found below. I have also explained how you can download the necessary tools and configure them.

**Please note that I have simulated below tests in my laptop since the actual code belongs to my client. I have no authority to publish the actual code here, but the configurations used in both cases are same. **

First, Lets download the latest version of Apache JMeter.

http://jmeter.apache.org/download_jmeter.cgi

jmeter_download_page

JMeter needs a JDBC driver to connect to oracle database, You can find the JDBC connect for Oracle at the Oracle Technology Network (OTN) website.

http://www.oracle.com/technetwork/database/features/jdbc/index-091264.html

jdbc_driver_download

First, download JMeter and unzip to the folder where you want to save it. Go to /bin folder and you can find windows batch executable (jmeter.bat), double-click on it and it will start the JMeter GUI. If you are in Linux there is a jmeter.sh script in the bin directory which invokes jmeter UI.

Now, download the JDBC driver from OTN and move the .jar file to /lib folder. It will be automatically detected and used by JMeter.

You can also download a lot of JMeter plugins, which will make your testing easy and will help you present your results in beautiful graphs.

Go to the JMeter UI.

jmeter_home

I had created a stored procedures in my local oracle instance, which will be tested by JMeter. This stored procedure accepts number value as input and return a number and a cursor.

stored_proc_code

Go back to the JMeter and create a new thread group, which will monitor and control our testing.

create_thread_group

Change the thread group name, you can give whatever name you want. Here I gave “OracleLoadTest_Sproc” for my thread group. Also we can set the number parallel threads and ramp up period in this screen.

thread_grp_details

After this we have to configure our database connection. JMeter can connect to Oracle database using a JDBC driver.

Right click on thread group and add a new JDBC connection configuration.

db_connection_1

Now configure the connection settings, Here I have specified the server name as localhost since it is installed on my laptop. You can find your DB server details in TNSNAMES.ORA file or can get it from your DBA. You also have to set your database username and password for establishing the connection.

db_connection_2

Our input data is coming from a CSV file and we usually test with 100K input fields. Here I have used a small file just to make sure the setup is working.

csv_config1

You have to configure the source file name and column names here. These column names are used later as the input parameter for the stored procedure.

csv_config2

Now we have to add a constant throughput time which helps us to main a constant throughput through out our test window.

throughput_timer_1

Here I had set the timer as 60 threads/minute (1 Thread/Sec).

throughput_timer_2

Let us add the component that calls stored procedure. Add a JDBC request to the thread group and include stored procedure details in it.

sproc_jdbc_call_1

We have to set the query type as Callable Statement and use the CALL command to invoke the stored procedure. We can also pass the values from CSV file to the stored procedure. Just to make sure the type for cursor variable is-10 for the stored procedure.

sproc_jdbc_call_2

Now add few listeners which monitor the execution and summarize the output. This will help us to present the final results more clearly to the client. You can add as many listeners as you want, We are adding just two here.

summary_report

summary_report_final

resultstree

We are all set here, lets start the execution and collect the test results.

test_start

Once the test is complete, listeners provide test summary and other execution details.

summary_report_final

We can see the stored procedure invocation details (input values, output values etc.) also from the result tree screen.

sproc_output_2

sproc_output_1

One important factor is JMeter is a Java application and could use a lot of heap memory. By default JMeter 3.1 uses 512 MB of heap memory. You will definitely need more data to run tests in GUI mode. Edit the jemeter.bat using any good text editor like UltraEdit and add more memory based on your hardware configuration.

You can run JMeter from the command prompt if you have a memory constraint and save the results to a jtl file.

Automatic Big Table Caching in Oracle 12C

Oracle uses its buffer cache for caching or storing recently accessed table blocks. This helps Oracle to access the same blocks faster if they are required again. Since the buffer cache resides in memory and memory is expensive this cache size is always limited. Oracle uses a LRU (Least Recently Used) algorithm to keep the most recently access blocks in memory. It is a complex algorithm for buffer cache management, but lets simplify it by saying oracle keeps a simple queue which holds the most recently used data at the hot end. As we query more and more data, existing data in the queue is pushed backwards and finally moves out of the queue.

When you query some data which had already been moved out of cache, oracle finds this data is no longer in memory and it goes for physical reads (from disks) and this is an expensive and time consuming operation.

One of the big issue with this kind of a cache is, if you query a big table most of the queue can be replaced by the data from that table alone and all subsequent queries may go for physical reads. Oracle can’t allow this and such reads bypass the buffer cache to maintain its balance. Oracle usually avoids moving the blocks of huge tables into buffer cache by using direct path reads/writes which uses the PGA (Program Global Area) which is not a shared memory area. Since PGA is not shared among the users, such caching of data is not useful for other users of the database. And this may lead to extensive physical read operations.

Recent versions of oracle (12c) is trying to overcome this issue by identifying the big tables in the database and caching data from those tables effectively. This is done by reserving a part of buffer cache for storing big tables.

Let’s test this feature by creating couple of big tables (> 1 Million rows).

SQL> create table my_test_tbl
 2 (Name varchar2(100),
 3 Emp_No integer,
 4 Dept_no integer);

Table created.

SQL> insert into my_test_tbl
 2 select 'John Doe', level, mod(level,10)
 3 from dual
 4 connect by level <= 1000000; SQL> commit;

Commit complete.

SQL> select count(*) from my_test_tbl;

COUNT(*)
 ----------
 1000000

We need to analyze the table, so that the metadata will be updated.

SQL> analyze table my_test_tbl compute statistics;

We will have to set a parameter at system level so that a part of the buffer cache (40% in our case) will be allocated for caching big tables. First , lets check the size of buffer cache allocated for this database.

SQL> select component, current_size/power(1024,3) current_size_GB from v$memory_dynamic_components
 2 where component = 'DEFAULT buffer cache'

COMPONENT CURRENT_SIZE_GB
 -------------------- ---------------
 DEFAULT buffer cache 1.546875

We have 1.5GB of buffer cache, let’s allocate 40% of this for caching big tables.

SQL> show parameter big_table

NAME TYPE VALUE
 ------------------------------------ ----------- ------------------------------
 db_big_table_cache_percent_target string 0

SQL> alter system set db_big_table_cache_percent_target = 40;

System altered.

SQL> show parameter big_table

NAME TYPE VALUE
 ------------------------------------ ----------- ------------------------------
 db_big_table_cache_percent_target string 40

Now, if we query the table it will be cached in to the big table cache.

SQL> select count(*) from my_test_tbl;

COUNT(*)
 ----------
 1000000

Please make note that we don’t have to restart the DB for modifying this parameter. Lets check the caching of the table and how much of it is cached,

SQL> select * from V$BT_SCAN_CACHE;

bt_pic_1Clearly shows 40% is reserved for big tables.

bt_pic_2

We have already queried the table once and oracle had identified that the table is indeed a big one. Now we have table in cache, we can check the size of the table on disk and how much of it is cached. Since the V$BT_SCAN_OBJ_TEMPS table contains the object id we can join it with DBA_OBJECTS and find out the table name. Once we have the table name DBA_TABLES will give us the size of the table on disk (blocks).

SQL> select object_name from dba_objects where object_id = 92742

OBJECT_NAME
 --------------------
 MY_TEST_TBL

SQL> column table_name format a20
 select table_name, blocks from dba_tables
 where table_name = 'MY_TEST_TBL';

TABLE_NAME BLOCKS
 -------------------- ----------
 MY_TEST_TBL 6922

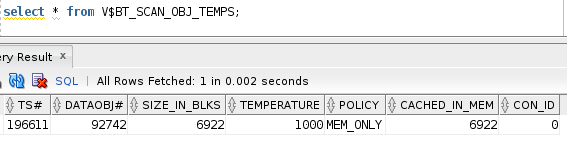
The whole table is cached now and the temperature is set to 1000, if we use this table more and more the temperature of this table will go up making it hot. Below code snippet will query my_test_tbl 10,000 times and this will help us to increase the temperature of the table.

SQL> declare
 2 l_count integer;
 3 begin
 4 for i in 1..10000
 5 loop
 6 select count(*) into l_count from my_test_tbl;
 7 end loop;
 8 end;
 9 /

PL/SQL procedure successfully completed.

Check the V$BT_SCAN_OBJ_TEMPS table again to see if the temperature value has gone up.

bt_pic_4

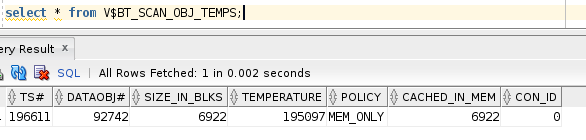
We can see the temperature of the table has gone up because of the frequent querying, now we are creating another table and see if that is also getting cached. We will have 2 million records in this table.

SQL> create table my_test_tbl2
 2 as select * from MY_TEST_TBL;

SQL> insert into my_test_tbl2 select * from my_test_tbl;

1000000 rows created.

SQL> analyze table my_test_tbl2 compute statistics;

Table analyzed.

SQL> select table_name, blocks from dba_tables
 where table_name = 'MY_TEST_TBL2';

TABLE_NAME BLOCKS
 -------------------- ----------
 MY_TEST_TBL2 6224

SQL> select count(*) from MY_TEST_TBL2;

COUNT(*)
 ----------
 2000000

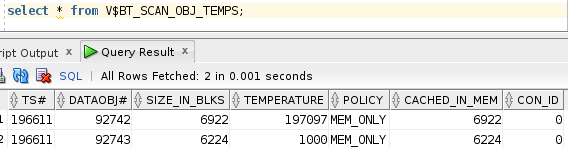
We can see the new table in cache with initial temperature value of 1000.

bt_pic_5

Lets run the snippet again to query the new table, this time we will query only 100 times.

Query V$BT_SCAN_OBJ_TEMPS again to see the new temperature value of second table.

bt_pic_6

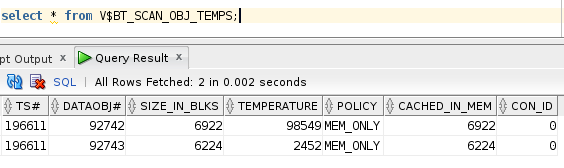
This temperature value helps oracle to prioritize tables in memory and identify which table is frequently queried. Based on this information oracle decides which table stays in memory and which table has to move out.

We have to remember currently we don’t have any option to move individual tables to the cache. It is completely automated and done by Oracle’s discretion. Our table may  or may not be  moved to this cache, but if you have big tables which you think may get benefited from this option then you can check this option.

Import data from MySQL to hadoop using SQOOP

As a part of our job we import/move a lot of data from relational databases (Mainly from Oracle and MySQL) to Hadoop. Most of our data stores are in Oracle with a few internal data stores running on MySQL.

SQOOP (SQL for Hadoop) is an Apache tool to import data from relational databases (There are separate drivers for each database) to hadoop. Here in this blog we will try to import data from a MySQL table to Hadoop file system.

Here, I have a MySQL instance running on the local machine on which my Hadoop cluster also running. You will have to download and place the driver in appropriate directory for SQOOP to connect to that database. Drivers are already present in my machine as SQOOP offers a very extensive support for MySQL.

Below link will give you a list of available drivers and their locations if you are using a different database.

https://sqoop.apache.org/docs/1.4.0-incubating/SqoopUserGuide.html#id1773570

First let me login to the primary node in my 3 node cluster (Virtual/Created by Vagrant and VirtualBox).

vagrant ssh node1

Let us check the connection and data in the MySQL database.

mysql -u root -h localhost -p
Enter password: ********
MariaDB [(none)]> show databases;
+--------------------+
| Database |
+--------------------+
| information_schema |
| my_test |
| mysql |
| performance_schema |
| test |
+--------------------+
5 rows in set (0.04 sec)

use my_test;

MariaDB [my_test]> show tables;
+-------------------+
| Tables_in_my_test |
+-------------------+
| name_data |
| name_data2 |
+-------------------+
2 rows in set (0.02 sec)

Now, lets check the data.

select count(*) from name_data;

MariaDB [my_test]> select count(*) from name_data;
+----------+
| count(*) |
+----------+
| 1858689 |
+----------+

MariaDB [my_test]> select * from name_data limit 3;
+------+--------+-------+
| Name | Gender | count |
+------+--------+-------+
| Mary | F | 7065 |
| Anna | F | 2604 |
| Emma | F | 2003 |
+------+--------+-------+

Now we are sure that we have data in MySQL table, lets check our HADOOP home directory.

hadoop fs -ls /user/vagrant/

[vagrant@node1 ~]$ hadoop fs -ls /user/vagrant
Found 5 items
drwx------ - vagrant hdfs 0 2016-12-20 02:56 /user/vagrant/.Trash
drwxr-xr-x - vagrant hdfs 0 2016-10-26 04:46 /user/vagrant/.hiveJars
drwx------ - vagrant hdfs 0 2016-11-13 23:44 /user/vagrant/.staging
drwxr-xr-x - vagrant hdfs 0 2016-12-06 04:13 /user/vagrant/test_files

Now we wants to move the data from MySQL to the /users/vagrant/name_data directory. Below is th sqoop command to move import data.

[vagrant@node1 ~]$ sqoop import –connect jdbc:mysql://localhost/my_test –username root –password ******* –table name_data –m 1 –target-dir /user/vagrant/my_data

Once this command is completed, data will be present in /user/vagrant/my_data.

[vagrant@node1 ~]$ hadoop fs -ls /user/vagrant/my_data
Found 2 items
-rw-r--r-- 3 vagrant hdfs 0 2016-12-20 03:20 /user/vagrant/my_data/_SUCCESS
-rw-r--r-- 3 vagrant hdfs 22125615 2016-12-20 03:20 /user/vagrant/my_data/part-m-00000

[vagrant@node1 ~]$ hadoop fs -cat /user/vagrant/my_data/part-m-00000| wc -l
1858689
[vagrant@node1 ~]$

[vagrant@node1 ~]$ hadoop fs -cat /user/vagrant/my_data/part-m-00000| head -3
Mary,F,7065
Anna,F,2604
Emma,F,2003

We can also create a config file and store the commands in it for re-usability.

[vagrant@node1 ~]$ cat sqoop_test_config.cnf
import
--connect
jdbc:mysql://localhost/my_test
--username
root

[vagrant@node1 ~]$ sqoop --options-file ./sqoop_test_config.cnf --password ***** --m 1 --table name_data --target-dir /user/vagrant/my_data

This also does the same job, but now we have the flexibility to save, edit and reuse the commands.

Access Oracle from Python

If you are a data engineer you might have to pull data from various sources and relational databases (RDBMs) is one of them. Python has separate modules to connect to each of relational databases (Like Oracle, MySQL, PostgresSQL etc.). Today we will discuss how we can connect and query Oracle database from Python.

I hope you have working Python environment set up already. Here I’m using Python CLI with Python 2.7 for this tutorial.

1. Download and install oracle 12c database.

I have downloaded Oracle 12C database from OTN (otn.oracle.com) and installed in my CentOS 7 laptop. Since it is installed in my laptop, server name is localhost and the database name is pdborcl.localdomain

2. We need to install an python module called cx_Oracle which can help us to connect and extract data from the Oracle instance. It gave me couple of errors when I first tried to install on my machine.

[oracle@ora-c7 ~]$ sudo pip install cx_Oracle
 Collecting cx_Oracle
 Using cached cx_Oracle-5.2.1.tar.gz
 Complete output from command python setup.py egg_info:
 Traceback (most recent call last):
 File "", line 1, in 
 File "/tmp/pip-build-kkqi2h/cx-Oracle/setup.py", line 170, in 
 raise DistutilsSetupError("cannot locate an Oracle software " \
 distutils.errors.DistutilsSetupError: cannot locate an Oracle software installation

----------------------------------------
 Command "python setup.py egg_info" failed with error code 1 in /tmp/pip-build-kkqi2h/cx-Oracle/

This is because some packages are missing and we need to install them before installing cx_Oracle. Lets install setuptools and ez-setup.

[root@ora-c7 oracle]# pip install --upgrade setuptools
 Collecting setuptools
 Downloading setuptools-28.7.1-py2.py3-none-any.whl (472kB)
 100% |████████████████████████████████| 481kB 857kB/s
 Installing collected packages: setuptools
 Found existing installation: setuptools 20.10.1
 Uninstalling setuptools-20.10.1:
 Successfully uninstalled setuptools-20.10.1
 Successfully installed setuptools-28.7.1

[root@ora-c7 oracle]# pip install ez_setup
 Collecting ez_setup
 Downloading ez_setup-0.9.tar.gz
 Installing collected packages: ez-setup
 Running setup.py install for ez-setup ... done
 Successfully installed ez-setup-0.9

Now lets try to reinstall cx_Oracle.

[root@ora-c7 oracle]# pip install cx_Oracle
 Collecting cx_Oracle
 Using cached cx_Oracle-5.2.1.tar.gz
 Installing collected packages: cx-Oracle
 Running setup.py install for cx-Oracle ... done
 Successfully installed cx-Oracle-5.2.1

Lets try to run a sample program which connects and pull some data. We will connect and get the oracle database version and query a table. This is a simple program we can do much complex processing with Cx_Oracle, I will list them in another blog.

Oracle version I have is 12C and the table has 100 records in it.

[oracle@ora-c7 ~]$ python
 Python 2.7.5 (default, Sep 15 2016, 22:37:39)
 [GCC 4.8.5 20150623 (Red Hat 4.8.5-4)] on linux2
 Type "help", "copyright", "credits" or "license" for more information.
 >>> import cx_Oracle
 >>> from pprint import pprint
 >>> db=cx_Oracle.connect('******','*****','localhost:1521/pdborcl.localdomain')
 >>> print db.version
 12.1.0.2.0
 >>> cursor = db.cursor()
 >>> cursor.execute('select count(*) from my_tab');
 >>> pprint(cursor.fetchall())
 [(100,)]

OEM Express in 12C

If you are looking for some basic database monitoring, Oracle 12C provides Enterprise Manager Express for that purpose. It is a light weight version of EM with limited features. I use it to monitor the oracle 12c instance installed on my laptop which runs on CentOS 7.0.

For accessing the EM express we have to enable the HTTP and HTTPS port for the database . Here is how you can check the HTTP and HTTPS port settings for your database.

SQL> select dbms_xdb.getHttpPort() from dual;

DBMS_XDB.GETHTTPPORT()
 ----------------------
 8080

SQL> select dbms_xdb_config.getHttpsPort() from dual;

DBMS_XDB_CONFIG.GETHTTPSPORT()
 ------------------------------
 5501

If you want to manually set up the HTTPS or HTTP port you can do that by logging into the database and running the below commands.

SQL> exec dbms_xdb_config.sethttpsport(5501);

or

SQL> exec dbms_xdb_config.sethttpport(8080);

In order to use EM Express, a database user needs to have been granted the EM_EXPRESS_BASIC or EM_EXPRESS_ALL role.  The DBA role includes both the EM_EXPRESS_BASIC and the EM_EXPRESS_ALL roles.

Once this is done use the below URL to access EM Express.

https://localhost:5501/em

Login page.

emexpress1

Home Page.

emexpress2

Performance Home.

emexpress3

It may not have all the OEM features but a nice tool indeed.

Oracle INMEMORY option for heap table

Oracle inmemory options allows users to store their data in memory. This is how we can enable inmemory option which provides faster access to table data.

SQL> show parameter inmemory_size

 NAME                                 TYPE        VALUE
 ------------------------------------ ----------- ------------------------------
 inmemory_size                        big integer 0

Here in my database inmemory  size is set to zero. We can change it by editing this parameter, restart the database after changing this parameter.

SQL> alter system set inmemory_size=100M scope=spfile;

System altered.

SQL> shutdown immediate;
 Database closed.
 Database dismounted.
 ORACLE instance shut down.
 SQL> startup open;
 ORACLE instance started.

Total System Global Area 2432696320 bytes
 Fixed Size 2927288 bytes
 Variable Size 637535560 bytes
 Database Buffers 1660944384 bytes
 Redo Buffers 13848576 bytes
 In-Memory Area 117440512 bytes
 Database mounted.
 Database opened.
 SQL> alter pluggable database all open;

Pluggable database altered.

Check the value of inmemory_size again for the database.

SQL> show parameter inmemory_size

NAME                                  TYPE        VALUE
 ------------------------------------ ----------- ------------------------------
 inmemory_size                        big integer 112M
 SQL>

Now we can see the parameter is set to 112MB and this can be used to store our table data. Now inmemory store doesn’t contain any table and this can be verified by the below command.

SQL> select count(*) from v$im_segments;

COUNT(*)
 ----------
 0

Now, pin the table into inmemory store.

SQL> alter table my_tab inmemory;

Table altered.

SQL> select count(*) from v$im_segments;

COUNT(*)
 ----------
 0

Table is stored in INMEMORY store only after we query it first time.

SQL> select count(*) from v$im_segments;

COUNT(*)
 ----------
 0

SQL> select count(*) from my_tab;

COUNT(*)
 ----------
 10000

SQL> select count(*) from v$im_segments;

COUNT(*)
 ----------
 1

Execution plan clearly show if the table is accessed from memory. So, lets get the execution plan for the above count statement.

 SQL> set autotrace traceonly explain;
SQL> select count(*) from my_tab;

Execution Plan
----------------------------------------------------------
Plan hash value: 2076930067

------------------------------------------------------------------------------
| Id  | Operation            | Name   | Rows  | Cost (%CPU)| Time     |
------------------------------------------------------------------------------
|   0 | SELECT STATEMENT        |         |       1 |       1   (0)| 00:00:01 |
|   1 |  SORT AGGREGATE         |         |       1 |          |         |
|   2 |   TABLE ACCESS INMEMORY FULL| MY_TAB |       3 |       1   (0)| 00:00:01 |
------------------------------------------------------------------------------

Top-N queries in oracle 12c

Oracle 12c has a new feature to select top N queries easily. This can be done by using the FETCH clause and the syntax is as follows.

[ OFFSET offset { ROW | ROWS } ]
[ FETCH { FIRST | NEXT } [ { rowcount | percent PERCENT } ]
    { ROW | ROWS } { ONLY | WITH TIES } ]

Lets create a table with 100 rows and see how this command works. We will insert a sequence of 1-100 into the table from dual using the connect by clause.

SQL> create table my_tab as
  2  select level id from dual
  3  connect by level <= 100;

Table created.


SQL> select count(*) from my_tab;

COUNT(*)
----------
 100

Now lets check how this feature now. We will sort the ids in descending order and pick the top 5/6 values from the list.

SQL> select * from my_tab
  2  order by id desc
  3  fetch first 5 rows only;

    ID
----------
    100
    99
    98
    97
    96

SQL> select * from my_tab
  2  order by id desc
  3  fetch first 6 percent rows only;

    ID
----------
    100
    99
    98
    97
    96
    95

6 rows selected.

SQL> select * from my_tab
  2  order by id desc
  3  offset 5 rows fetch next 5 percent rows only;

    ID
----------
    95
    94
    93
    92
    91

Oracle Identity Columns in 12c

Identity columns are a new feature in Oracle 12c. We need the CREATE SEQUENCE privilege for using this feature. The syntax is given below.

GENERATED
 [ ALWAYS | BY DEFAULT [ ON NULL ] ]
 AS IDENTITY

There are two options to create an identity column, As mentioned ALWAYS clause will always populate the column automatically. Any attempt to insert a value (Even NULL) will throw an error. BY DEFAULT /ON NULL  will populate only if we don’t specify the value or we try to insert a null value. Otherwise it will insert the value we specify in our insert statement.

Lets check how this feature works. At first we will create the table with ALWAYS option.

SQL> create table my_tab
 2 (
 3 name varchar2(50),
 4 id integer GENERATED ALWAYS AS IDENTITY
 5 );

Table created.

We have created the column id as IDENTITY column and which will be always populated by oracle. It wont let us insert a value/NULL in that column.

SQL> insert into my_tab (name) values ('John');

1 row created.

SQL> insert into my_tab values ('Mike', 2);
 insert into my_tab values ('Mike', 2)
 *
 ERROR at line 1:
 ORA-32795: cannot insert into a generated always identity column

SQL> insert into my_tab values ('Steve', NULL);
 insert into my_tab values ('Steve', NULL)
 *
 ERROR at line 1:
 ORA-32795: cannot insert into a generated always identity column

SQL> insert into my_tab (name) values ('Steve');

1 row created.


SQL> select * from my_tab;

NAME                                               ID
-------------------------------------------------- ----------
John                                               1
Steve                                              2

Now lets recreate the table with DEFAULT option.

SQL> create table my_tab
 2 (
 3 name varchar2(20),
 4 id integer GENERATED BY DEFAULT ON NULL AS IDENTITY
 5 );

Table created.

SQL> insert into my_tab values ('Tom', 1);

1 row created.


SQL> insert into my_tab (name) values ('James');

1 row created.

SQL> insert into my_tab values ('Nick', NULL);

1 row created.

SQL> select * from my_tab;

NAME                 ID
-------------------- ----------
Tom                  1
James                1
Nick                 2

DEFAULT clause will insert the value if we don’t specify in the INSERT statement or we try to insert a NULL value.